
How to create installation DMG files in OS X
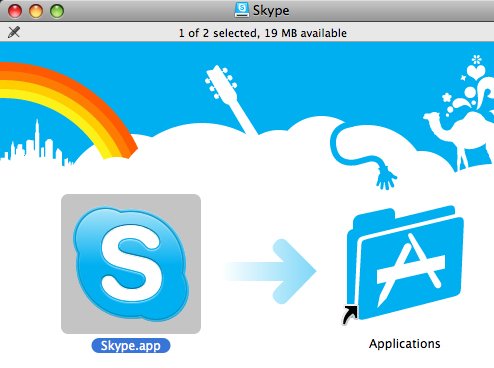
One of the coolest features of Mac OS in comparison with Windows is the simplicity of apps’ installation. In Windows, in most cases, there should be an installation package; otherwise, the app won’t run correctly. On the contrary, Mac apps installations are much simpler. All you need to do is to copy the app bundle to the Applications folder; so, no installation is needed. The installation process of Skype for Mac is a very good example. To install Skype you just need to drag the app icon into the Applications folder. by doing this, you’re copying the Skype app bundle to your Applications folder. The following is the Skype installation page for OS X:
Now how can you create such installation page for your own app?
First of all, look at the picture above. The installation page contains three major sections:
- The First is the application bundle (in this case, Skype.app).
- The second is the OS X Applications folder.
- The third one is the background image of the installation page.
These three things are the requirements to create a DMG installation file. However, you can ignore the background image and let it be just a solid white color background, it’s much better to have a custom background color or image for your installation page. It make your installer more friendly and of course more beautiful. In addition, there is one more requirement (which is obvious of course): You will need a Mac machine to build DMG installation files. As far as I know, you cannot create DMG installation files in Windows.
Getting Started
After all of three requirements I’ve mentioned above were present, you can get started. I decide to break this tutorial into steps so it’s much easier to understand:
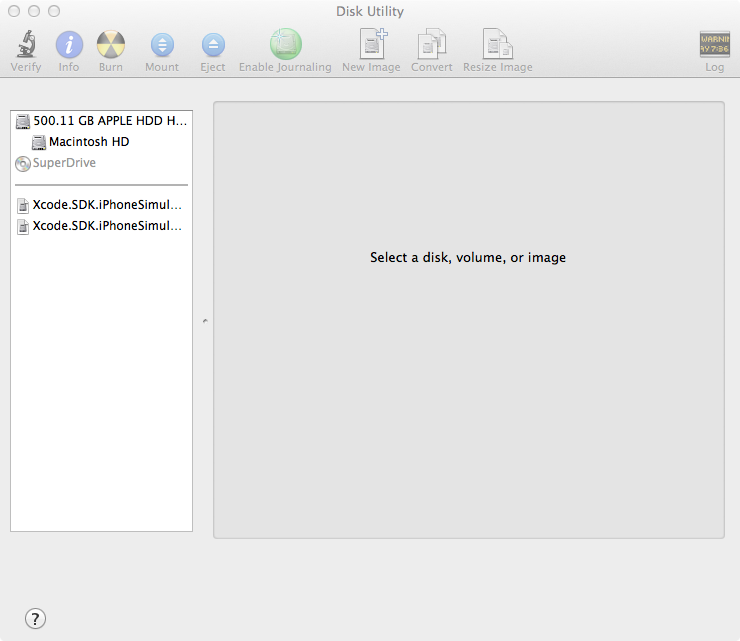
The very first thing to do is to create an empty DMG file so we can put our custom files in it. To do so, OS X has a built-in tool named Disk Utility. You can simply search for it in spotlight search box (On the top right of your screen).
In the Disk Utility home page click New Image button on the top of screen. When New Image button is clicked, a window will be appeared like the following:
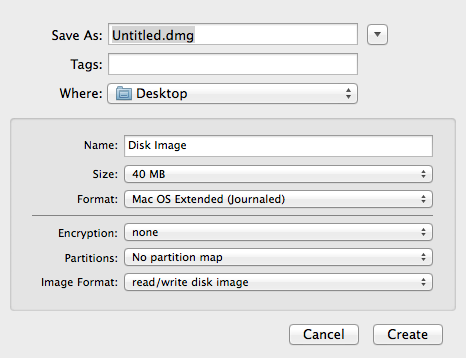
There are some settings in the New Image window which need your consideration. The first field is the path of your DMG file that is going to be created. The second field is name. It is recommended to set this field as the name of your application because users will see this name when they mount your DMG file on their machine. The third field is size of disk image. Unfortunately, disk images’ file sizes could not be dynamically allocated so you need to pick a size which is right for your application’s size. It’s recommended to choose a size which is a little larger than your application bundle (The minimum size of disk image is 21MB in OS X). The forth field is image format. This field’s value is set to Mac OS extended by default and there’s no need to change it; so, leave it as it is. Encryption and Partitions fields are fifth and sixth fields in the New Image window which should be left as the default value. We don’t need any encryption or partitioning for now. The last field, Image Format, is sightly important here. You have to set this field’s value to read/write disk image. You won’t be able to create the installation DMG if you select anything else! After setting all fields, click Create to create the disk image.
By clicking Create your disk image will be created and will be automatically mounted. Close Disk Utility, go to Desktop and double-click on the mounted image to see its content. You can see the disk image is empty as you expected. In the next section we need to fill it by adding our custom files. The reason we’re able to add files to our disk image is because we set the image format field to “read/write disk image”.
It’s time to add our custom-designed background image to our installation (If you don’t want to add an image to your installation page, you can skip this section).
You can simply drag your custom background image to the mounted disk. As you can see the file has been copied to the disk image but has not set as disk image background. To do so, right click on the mounted image on your mac desktop and select Show View Options.
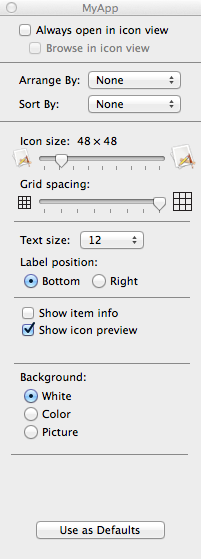
There are two things that need to be taken care of in the Show View Options page. The first one is Icon Size and the second is Background.
Icon Size indicates the size of our two main icons in the installer page (Our two icons are your app bundle icon and the Applications icon). Icon size is completely up to you. In the Skype example I’ve mentioned earlier, the icon size is set to the maximum which is 128*128 pixels. I myself prefer to use the maximum as well; because, it makes it easier for users to do the drag-drop action.
After setting the icon size, it’s now time to set the background image. Just select picture item from background radio button group and then DRAG the image you’ve just copied into the disk image (not from other paths of your hard drive) to the “Drag image here” section. As soon as you drop the image, the background will be set. There’s no Save button. All changes will be saved automatically; so, you can close Show View Options window. You can also resize the disk image window by its corners (as same as what you do when want to resize other windows in OS X) to fit your window size with the background image.
The interesting part is that all of your actions will be kept and the next time you open your disk image, background image, icon size and window size is saved.
Note: DO NOT CLICK ON “USE AS DEFAULT” BUTTON. IT WILL SET YOUR SPECIFIED CONFIGURATION INCLUDING BACKGROUND IMAGE TO ALL FOLDERS ON YOUR MAC.
As you may have noticed, The image file is in the middle of disk image window. We need to make it hidden so users can’t see it. There are plenty of ways to make a file hidden but one of the coolest ways is to add a “.” to the first of file name. In Unix systems like Mac, files which are started by a “.” are hidden by default. You can’t change the file name in the finder. You need to rename the file in terminal. So open a terminal window and do the following:
cd /Volumes/[YOUR DISK IMAGE NAME]
mv [YOUR BACKGROUND FILE NAME] .[YOUR BACKGROUND FILE NAME]
As you can see the file is now hidden!
The next step is to copy our app bundle. To do it just copy the app bundle to your disk image. You can also change the location of app bundle to any place of disk image we want. After the bundle has been copied, We need to make an Application icon so use can drag the app to it. To do so, go to you Macintosh HD, click on Applications, hold Command and Option key, and dray it to the disk image window. By holding Command+Option it will make an alias of that folder. Note that we’re not copying the Applications folder, we’re just making an alias from it. Place the two icons near each other so it’s easier for users to install the app.
We’re almost done. Your installation DMG file is ready; but, there is something. By publishing this DMG file, all users can change its background image, icon size, window size, and etc. In fact, they can do whatever you can! To prevent this, we need to make this disk image read-only.
Eject the disk image by right-clicking on disk image icon and selecting “Eject”. Re-open the Disk Utility tool again. On the left side of Disk Utility home pas select the DMG file we’ve created, then, select Convert. The convert window will show up. select a unique name for it and from Image Format select read-only. Click save to create a new disk image from your selected one. The new DMG file we’ve just created is read-only can be safely published and others cannot make changes to it.
If you have any question, don’t hesitate a moment; just ask it on the comments down below.


