Five useful git commands & options that are not being used often

git changed the way we all think of a source control program. It’s simple yet powerful with a lot of features and capabilities; however, I see software engineers use only a handful of its commands in their day-to-day work. So, in this post, I would like to mention some git commands and options that are not being used so often but are very useful.

According to my observation (Probably people have already researched about it), These are the most used git commands by engineers: clone, commit, push, pull, add, status, stash, log, merge, and maybe rebase (I said maybe because the majority of people tend to use merge instead). Nowadays, I see some people also use the built-in git features in their preferred code editor or IDE. For example, in an IDE like PyCharm or VSCode, there’s a very powerful git integration that a lot of people are using (and it’s totally fine). However, somehow I don’t feel comfortable using them. The fact is, I want to see exactly what is happening under the hood and be able to run those commands myself.

The following is a list of some commands and options that you may don’t use often but they are very useful and powerful:

git commit --amend

When I’m coding, I commit very often and I believe this is the right thing to do; however, some engineers commit only when they are finished with the task. Sometimes after saving a commit, I notice there are still things that I would like to include in the commit message. Or, sometimes after I commit and before I push the code, I suddenly realise that there are still things that I would like to include in the same commit. Of course, I can still add them to a different commit, but to make the commit history cleaner I prefer to include them in the current one (Yes, I might have an OCD). To do that, the git commit --amend can be used. If you add the --amend at the end of the commit, it will add the staged files to the last commit and it also allows you to modify the commit message if you want.

Important: It’s very important not to use --amend when you have already pushed the changes into the remote. Otherwise, the will be conflicts between your local and the remote.

git show

I personally like this one a lot. A lot of times, you would like to understand what has changed in a commit. One way that is being used by most of the engineers I know is to use the Github/Gitlab GUI. However, you can do it easily offline as well using git show. To use this command, you need to have the commit hash (you can get it using git log):

git show 65de9d3c6afe0c75d5956b9fac692915881bd195

The above command shows all of the changes that happened in the commit 65de9d3c6afe0c75d5956b9fac692915881bd195. A lot of time, you would like to know what’s changed in the last commit. To do that you can use the HEAD keyword which points to the last commit in the tree.

git show HEAD

git diff [--staged]

A lot of times before you commit your changes, you may like to know what you have changed. Using the diff command will help you. It’s very similar to the show command we discussed above but for the current state of your work. One thing to note is that by default the diff command will now show changes that are staged. If you want to see those, you can use the --staged option.

git clone --depth=0

There are a lot of cases where I want to clone a project and check the source code but I don’t care about the history of all of the commits. This is mainly because I don’t want to contribute to the project but like to only check the code. For 90% of the project, there’s no such big difference given the recent internet connection speeds and computer hard drive capacities. However, there are still some projects that are too big to clone entirely. The Linux Kernel is a very good example of it. Android is another. When cloning a project you can use the --depth option to indicate the depth of history you would like to receive! If you would like to only have the latest state of the code, you can pass zero 0 to thedepth.

git log [options]

Git log is a classic git command. I also mentioned it in the beginning of the post. However, there are lots of very useful options that can be used to help you find what you want. Here are some of the them that I use the most:

git log --author=[the email address or name of the person] will show all of the commits by a specific person.

git log --oneline simplifies the log output by providing only the commit titles and not the details along with 7-character commit hashes.

git log --since=[date] --after=[date] will let you find the logs for the specific date range.

Nowadays, a lot of these commands and options I mentioned above are also available in your preferred Git service like GitHub and GitLab; but, as a person who prefers to spend more of his development time in the terminal, They are very useful. I hope you find it useful as well. If you know any cool git command that I haven’t mentioned it here, please feel free to email me using the one provided in the contact page.

In Git | 16 Sep 2023

How to access OS clipboard in neovim

One of the cool things about (neo)vim is that it has its own clipboard system meaning if you copy (yank) something, you won’t be able to just paste it in other apps because the clipboard is only available inside the editor. You might say this is not a good thing at all and I agree to some extend; however, in some cases it provides more flexibility.

Since I don’t like this behavior as well, whenever I configure a new machine, one of the first things I usually do is to setup my neovim in a way that it can read and write to the system clipboard. Recently, I was setting up an Ubuntu 22.04 laptop as my primary work machine and had some problem dealing with the clipboard in neovim; so, I decided to post this and provide some guide on how to access the system clipboard in different operating systems.

How it works actually?

Unlike vim, clipboard management in neovim is done via third-party apps. Consequently, you will need different tools for each OS you are working with. According to the neovim’s official documentation, for each OS, specific tools are required. So let’s dig in to each OS’s configuration separately:

macOS

The macOS configuration is probably the most straight-forward one since the pbcopy and pbpaste commands are already available. You all you need to do is to just set the clipboard correctly:

set clipboard+=unnamedplus

Windows

To be able to system clipboard on Windows, you need to install win32yank app. You can download it from here. After that, you need to set the clipboard just the macOS:

set clipboard+=unnamedplus

Note: I haven’t tried this myself since I don’t have any Windows machine.

Linux

Although accessing system clipboard should be the most straight-forward way on Linux; it’s not :-/ It’s actually depends on the window system that is being used. The two mostly used window systems are Wayland and X11:

Wayland

If you are using Wayland as your windows system (The default in Ubuntu 22.04 and some other mainstream distributions), you need to have wl-copy and wl-paste commands accessible in your $SHELL. You can install these two tools by install wl-clipboard package.

wl-clipboard can be installed using your distro’s package manager. For example in ubuntu you can use apt to install it:

sudo apt install wl-clipboard

However, if you couldn’t find it, you can simply check the GitHub repo here and install from source code.

X11

For X window system, you need to install xclip. Just like the instructions provided for the Wayland above, you should be able to install the package using the OS’s package manager. Also, if you couldn’t find it, you can also install it from source by checking the GitHub repo here.

Finally after installing the required tools, you need to also set the clipboard just like macOS and Windows:

set clipboard+=unnamedplus

How to solve Wayland issues with HiDPI and multiple monitors

Since I joined my current company, I had been using a 2020 Macbook Pro. To be honest, I was totally satisfied with that laptop as it was super stable. But the main reason I chose a Mac rather than Linux when I joined was because of the fact that at the time I joined the company, they were offering Dell Latidudes for Linux which are (in my opinion) not the best choices. Recently, the company announced that in addition to Dell laptops they have started to offer ThinkPad laptops for Linux users as well! So, without thinking further I requested it :)

Diffrent scale for each monitor

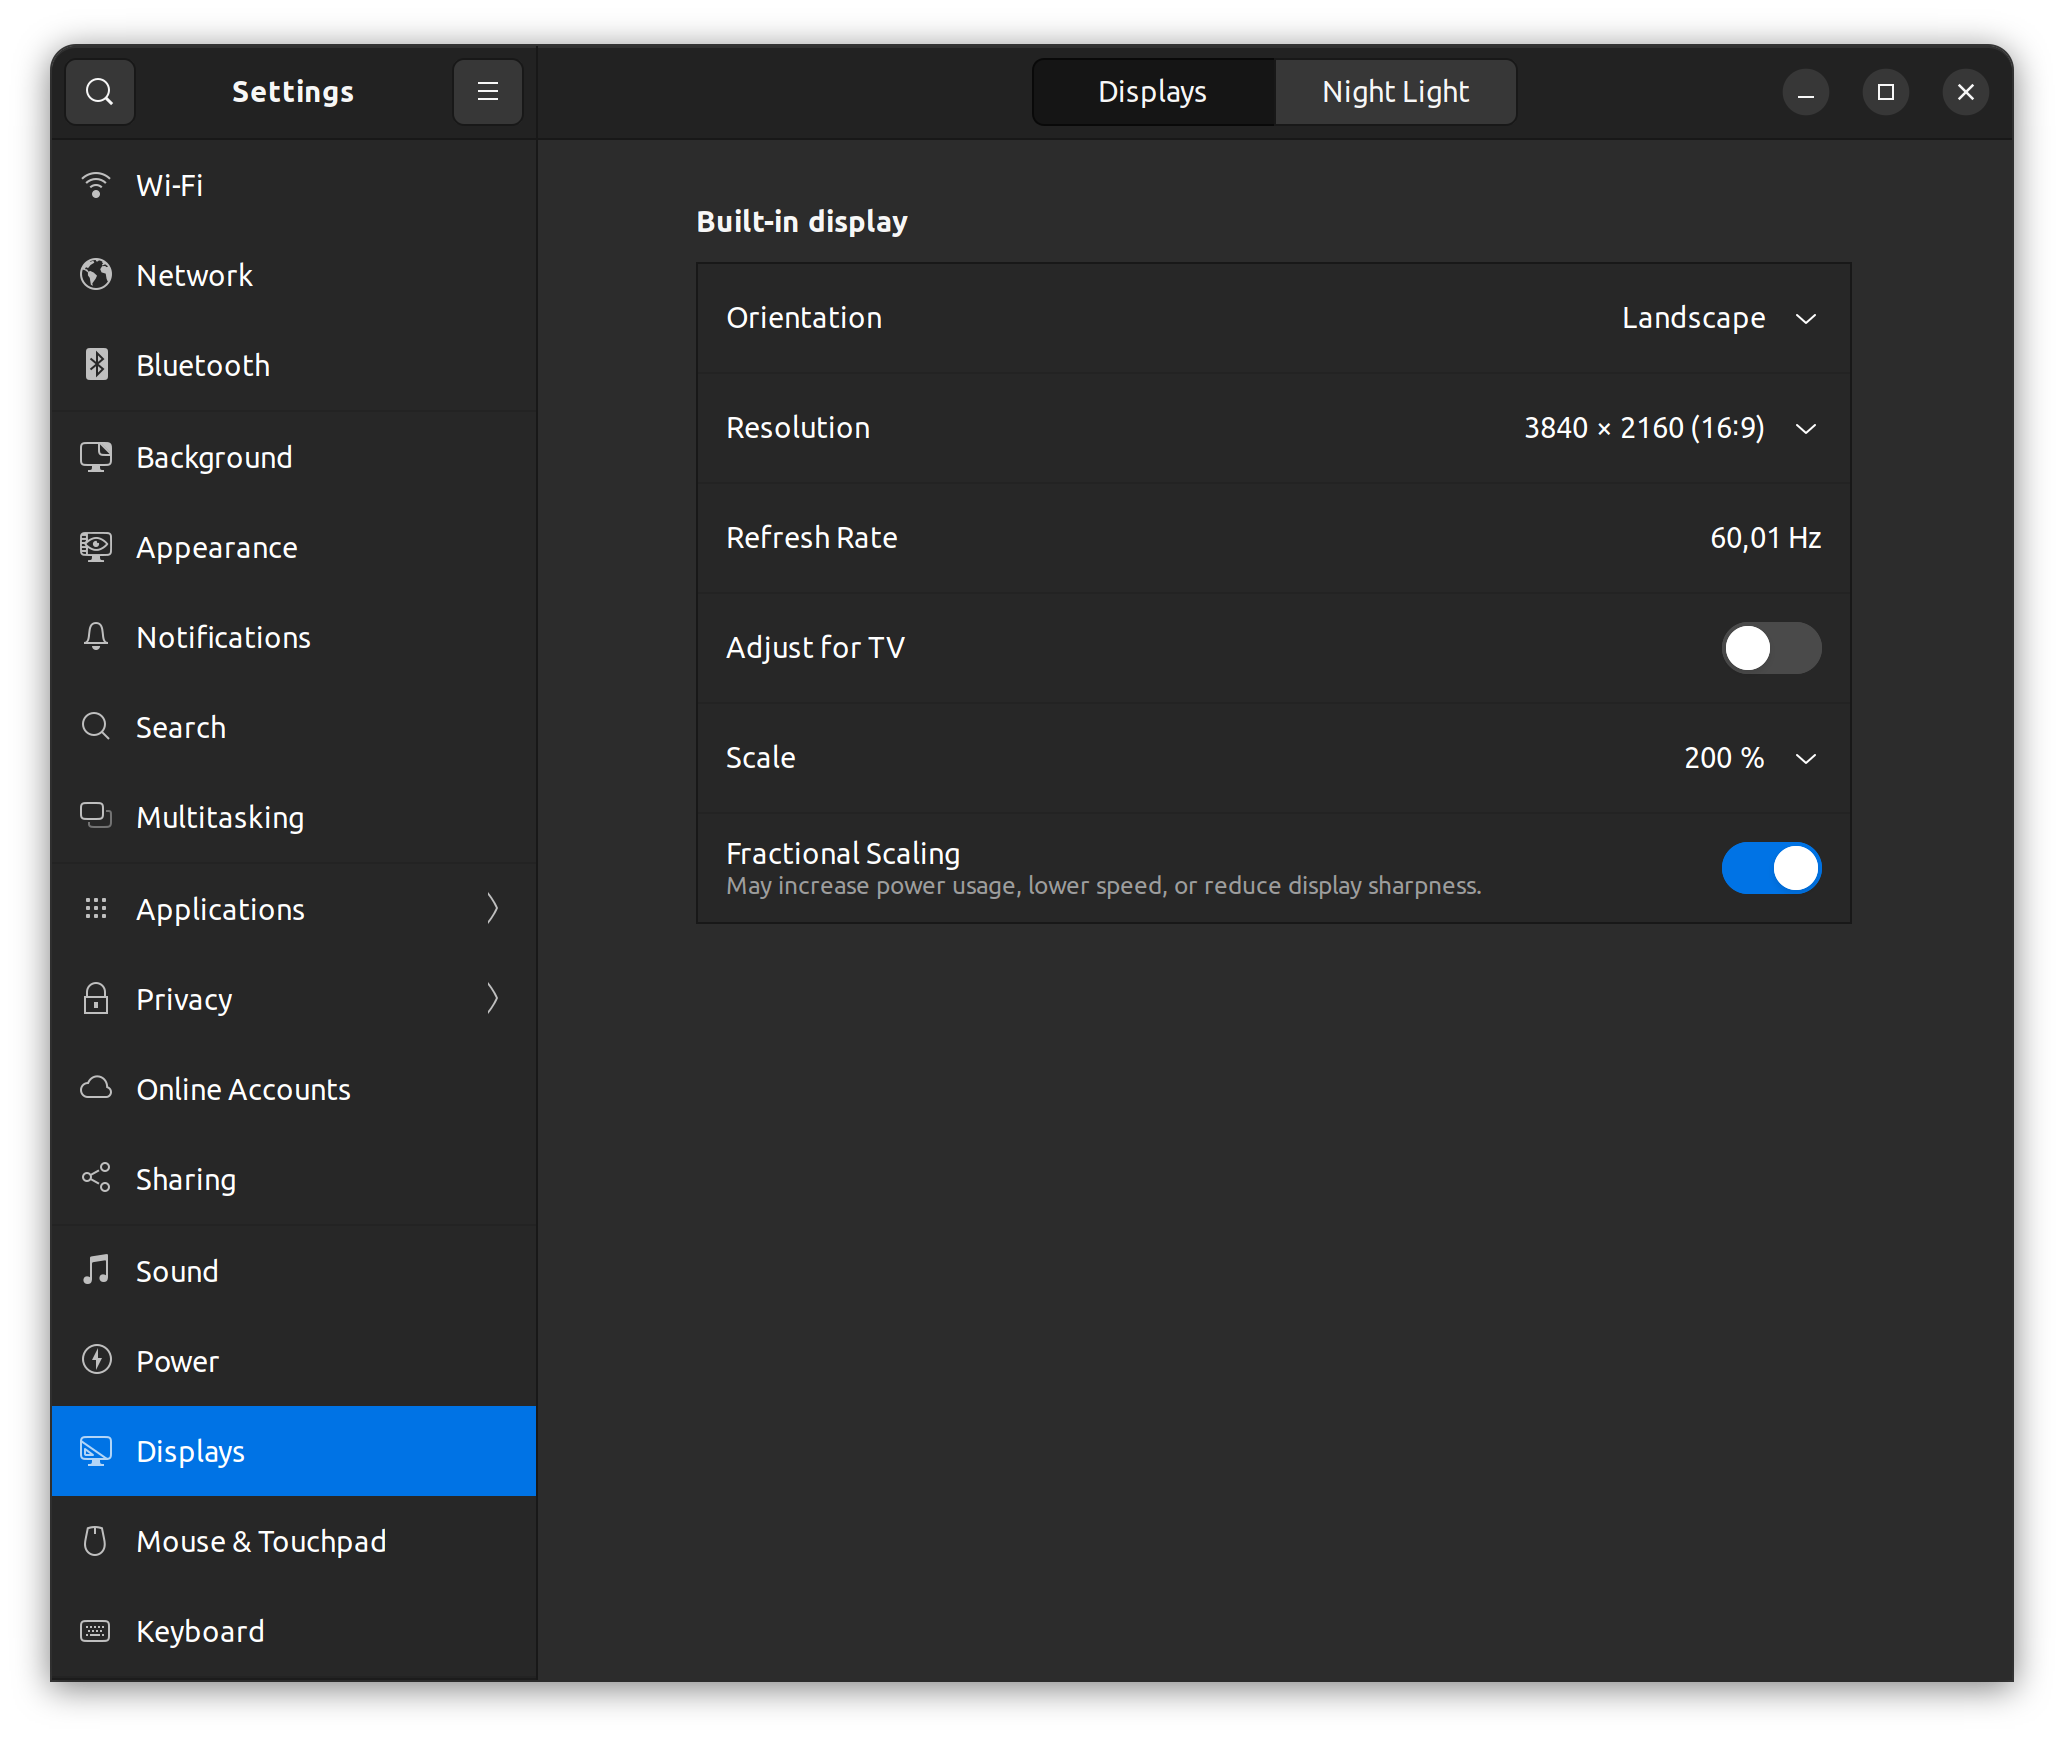
After receiving the new laptop, it took me a few days to configure it the way I want. At first, I had some issues with multiple monitor configurations and settings. The problem was I couldn’t set different scale factors for each monitor separately. When trying to do so, it was applying the last configuration to all of my monitors instead of keeping each configuration separated. I researched a lot about it and and realized that I had to activate the “Fractional Scaling” to be able to have separated configs for each monitor even if I didn’t want to use the actual fractional scaling feature.

So, if you want to set different scaling percentage for each monitors, you need to activate “Fractional Scaling” just like the following:

Fractional scaling option in GNOME Control Center

I know the provided solution is not relevant at all, but it was how it worked for me and I hope it works for you too.

Blurry texts in some apps

Another problem I faced was after changing the default scaling some apps’ texts became blurry. This is mainly because of the fact the some apps are not natively support Wayland. To Solve this problem you may need to two arguments when executing the app. These two arguments are --enable-features=UseOzonePlatform and --ozone-platform=wayland. For instance, here’s an example for Google Chrome:

google-chrome --enable-features=UseOzonePlatform --ozone-platform=wayland

You may say OK but I usually open Google Chrome from the menu not the terminal. Then, how can I add these arguments to the to the applications’ shortcuts? To include the arguments when running applications from the side menu or any menu in your Linux distro, you should add them to the applications’ .desktop files. Depending on the Linux distro you are using, the path to the files may vary. In Ubuntu, desktop files are located under /usr/share/applications. For example, to update Google Chrome shortcut, you should open /usr/share/applications/google-chrome.desktop (You may need to open the file with sudo since the user is root). After opening, search for the term Exec and add the above arguments like the following:

Exec=/usr/bin/google-chrome-stable --enable-features=UseOzonePlatform --ozone-platform=wayland %U

The only issue with this method is that every time apps are updated, they usually update their shortcuts as part of the installation process; so, you may need to do the steps mentioned above every time you update the apps.

Conclusion

Although more and more user are using Linux as their preferred desktop operating system, the application support is still limited in my opinion. You cannot expect everything to work as you expect from macOS and as a result, you should prepare yourself for a little bit of uncomfortably when want to switch to Linux OS especially for work. Also, all of the issues I have mentioned above are in place if you decide to choose “Wayland”. There’s also an option which you can use the legacy “X11” and according to my knowledge you won’t face any of the mentioned issues.

Apply coding standards by using pre-commit

When working on a project in a team, it’s typical that engineers’ coding styles might be different. It’s fine in the first place; however, if the number of engineers increases, you may end up having multiple coding styles in the project.

For example, one may prefer a line length of 80, the other may like 120. One may use Windows OS in which the line endings are \r\n while one may use a UNIX-like OS like macOS in which \n is used. Furthermore, it is very difficult to catch these types of during the code-review. No one likes (or can) take care of these tiny things because we are humans and making mistakes is part of our day-to-day life.

Also, there might be some runtime issues that cannot be identified during the development and testing. For instance, in Python projects, you may have a function like this:

def sum(a, b):
    return a + b

But then by mistake, you may use the function like this:

result = sum("1", "2")

Theoretically, the function definition and usage is correct. But is that really what you want? This may seem very obvious and trivial but believe me, in real-world projects, these things happen!

Although some of these human and runtime errors can be identified by the reviewer(s), there will be cases in which they may forget to spot them. As a result, the optimal way is to automate these processes. There are several tools out there for this type of automation but the one that I like and use is pre-commit.

How it works

As the name implies, pre-commit can be triggered when the user attempts to “commit” a new change. This is done by defining a new git hook. After the attachment, each time the git commit is run, pre-commit start checking all changed files.

To install pre-commit you can use your OS package manager. I am using macOS and Homebrew so the command to install would be:

brew install pre-commit

After installation, you need to install the git hook scripts. This is done by running the following in the repo directory:

$ pre-commit install
pre-commit installed at .git/hooks/pre-commit

After this pre-commit starts automatically every time a new commit is going to be created.

You can also trigger pre-commit manually and on all files inside the project by running. This is very useful you can run the checks again in your CI/CD pipeline:

pre-commit run --all-files

After the installation process is finished it’s now time to start configuring the pre-commit

Configurations

Pre-commit works by running some hooks that is defined as configurations. You can configure pre-commit by adding the .pre-commit-config.yaml file to your project. Here’s an example:

repos:
  - repo: https://github.com/pre-commit/pre-commit-hooks
    rev: v2.3.0
    hooks:
      - id: check-yaml
      - id: check-json
      - id: end-of-file-fixer
      - id: trailing-whitespace
  - repo: https://github.com/psf/black
    rev: 21.12b0
    hooks:
      - id: black

Each configuration starts with a list of repos in which the hooks exist. Each repo can have one or more hooks. In the above example, there are two repos defined. The first is the pre-commit’s default hooks repository which contains lots of useful hooks such as check-yaml, check-json, end-of-file-fixer, and trailing-whitespace that we have used. The second is the black hook which is a Python code formater. When a new commit is added, these hooks will be run automatically.

Note: When you change the pre-commit configuration file, it’s recommended to run pre-commit install again to fetch newly added hooks

For more information about pre-commit’s default hooks please check https://github.com/pre-commit/pre-commit-hooks

Using pre-commit for us is critical because it saves us a lot of time and energy, especially during code reviews.

In | 25 Mar 2022

It's now around 18 months that I have quit Twitter

I think I was one of the firsts among software engineers who started using Twitter in Iran back in 2007-2008; however, I am not proud of it at all. What makes me proud is that I was able to quit it 18 months ago! Also, I didn’t limit my self to just Twitter, and I also quit Facebook. Having said that, now the only social network that I am partially active in is Instagram which I have planned to get rid of soon.

No social media. Photo taken from:
https://aaasolutions.com/wp-content/uploads/2016/01/no-social-media.jpg

What I have experienced during the these 18 months is that, the advantages of Twitter and other social networks are radically less than their disadvantages. I think we are spending our most valuable thing, which is time, making money for social network companies while we don’t get too much of them. Even if you follow, NASA, MIT, or your favorite music band doesn’t mean that your time is spent meaningfully.

But one may ask, I use social networks to stay informed about topics I like! If I quit Twitter for example, how can I keep posted about my favorite soccer club? My approach is to be as specific as possible. For instance, I like astronomy. To be able to stay informed about the latest news and stories, I have signed up for a weekly newsletter called The Space Review. Every Tuesday, I get the top most important and trending stories about space directly in my inbox. Tech and programming are another examples, I check hackernews twice a week and also subscribed to ArchLinux mailing list.

This approach works for me but it may not work for you. But the good point here is that you have control over your time and that’s the important part.