
Configure and manage VPN connections programmatically in iOS 8
Connecting to VPN servers programmatically had been always an impossible task to do for developers because of Apple’s limitations.
In my previous post I’ve described that Apple introduced a brand-new Network Extension framework which gives developers the opportunity to configure VPN preferences programmatically but I didn’t describe how!
This post is a guide to manage VPN configurations in iOS 8 and OS X (10.10) Yosemite while there’s no official documentation published yet. I Also have to thank quellish who helped me a lot in this.
Requirements
- The very first and the most critical things you need is an actual device with iOS 8 beta 1 or above to test the app on! This tutorial cannot be tested on iPhone simulator. If you’re going to write a Mac application, OS X Yosemite Preview 3 or above has to be installed.
- Since this test doesn’t work on simulator, you have to be a member of iOS/Mac developer program. Also, you need to make some changes to your provisioning profile. You cannot use your iOS 7 provisioning profiles to develop iOS 8 VPN applications.
- Xcode 6 beta. By the time of this post (August 2nd, 2014), Xcode 6 is in beta 4 and just like I’ve mentioned in my previous post, you need to to a member of iOS/Mac program to have access to beta tools.
- Last but absolutely not least, you need a Mac since Xcode cannot be run on Windows or Linux machines.
Getting Started
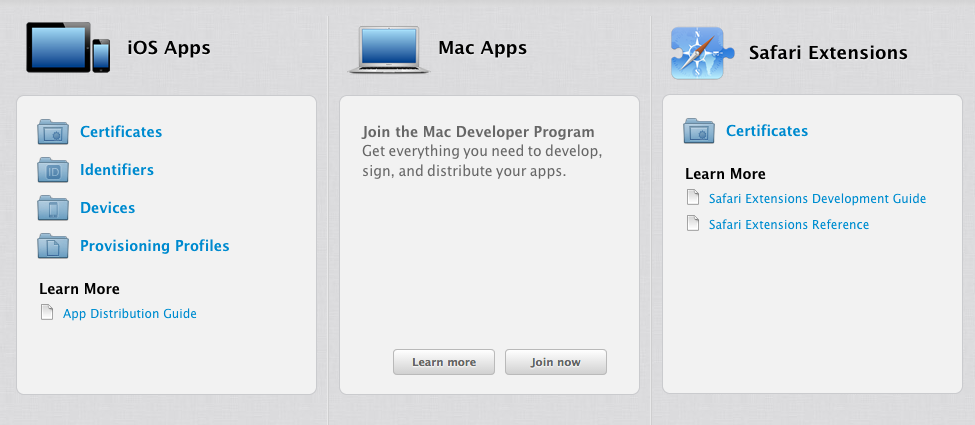
The first thing you need to do before actually start writing any codes is to update your provisioning profiles. If you haven’t created any profiles yet, you need to create one now! To do this, login to your developer account, then click on “Certificate, Identifiers & Profiles”:
Select Identifiers, then select the application you want to update its provisioning profile. If you don’t have any, you can create one using the plus sign. By selecting an app, a list will be appeared. This is a list of features the app is going to use, for example if you want to have iCloud functionality in your application, you have to turn iCloud feature on; otherwise, you won’t be able to test and deploy your iCloud based apps. The following is showing that list:
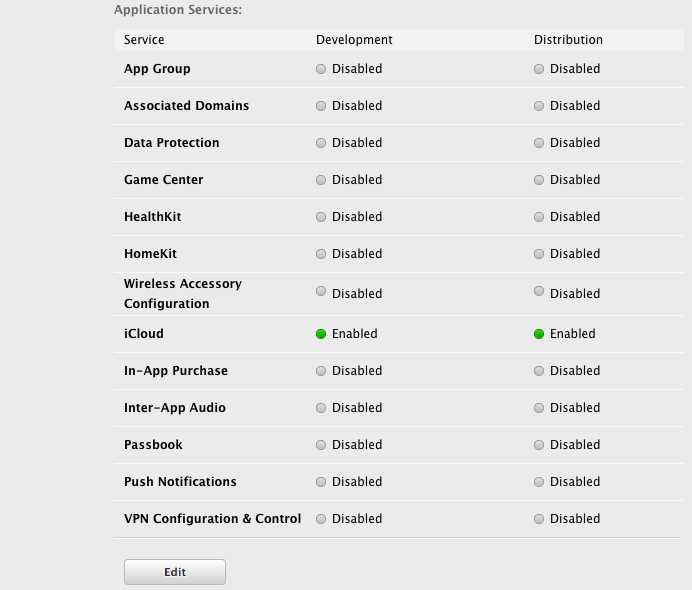
By the introduction of iOS 8, a new item has been added to this list which is “VPN Configuration & Control”. This is exactly what we’re looking for! So enable this feature by clicking on it and then ticking its checkbox. When you turn this feature on a modal window will be displayed which describes its functionality:
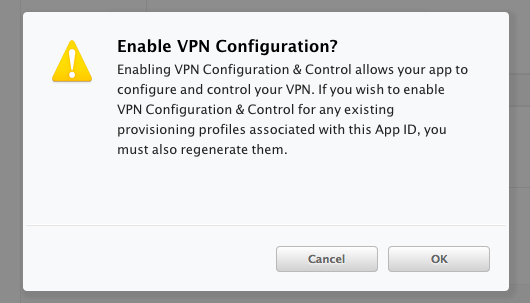
Enable VPN Configuration & Control feature and click “Done”. Then, download the provisioning profile again and replace it with the old one. We’re done here, now lets get back to Xcode.
Note: In this post I assume that you’re familiar with iOS development and Objective-C. If you’ve never developed any app in for iOS or Mac, you may need to learn some basic concepts and then return to this post.
Open Xcode and create a new iOS 8 single view application project. Then, place a button in the middle of screen and then connect it to your ViewController.
What we’re going to do is to setup VPN preferences on viewDidLoad: method and then connect to our specified VPN server when the button is tapped.
Before getting started, you have to know how all this work! If you understand the structure of Network Extension framework, then it will be much easier to develop apps based on it.
NetworkExtension.framework
Apple has done a brilliant job developing this framework. Every app can access system preferences but in its own sandbox; which means you cannot access other apps’ sandboxes.
First of all, saved preferences have to be loaded from OS to be able to be accessed. Once they’re loaded, it’s possible to make your changes. After changes have been made, they need to be saved. Unsaved preferences won’t be applied. Your app’s preferences can also be removed if you no longer need them. As a result, to create a VPN configuration we need to do the following:
- Load our app’s preferences
- Make our changes
- Save preferences
Note that you need to load your app’s preferences even if you haven’t set any configuration yet.
After VPN connection is created we can connect to or disconnect from it.
Network extension contains three major classes:
- NEVPNManager
- NEVPNProtocol
- NEVPNConnection
NEVPNManager is the most important class in this framework. It’s responsible for load, save and remove preferences. In fact, all VPN tasks have to be done through this class.
Create a new VPN connection
To get started a new instance of this class has to be created:
NEVPNManager *manager = [NEVPNManager sharedManager];
After NEVPNManager is initialized, system preferences can be loaded using loadFromPreferencesWithCompletionHandler: method:
[manager loadFromPreferencesWithCompletionHandler:^(NSError *error) {
    // Put your codes here...
}];
As I’ve mentioned in above code, the load method accepts a compilation handler block. This block is fired whenever the load process is completed. This block also has a parameter which is an NSError. the NSError parameter will be nil if the loading operation completed; otherwise, it will be non-nil. Accordingly:
[manager loadFromPreferencesWithCompletionHandler:^(NSError *error) {
    if(error) {
        NSLog(@"Load error: %@", error);
    } else {
        // No errors! The rest of your codes goes here...
    }
}];
After loading process is completed, It’s time to set up our VPN connection.
iOS 8 supports two major protocols. IPSec and IKEv2. It’s the first time that Apple offers IKEv2 protocol in its operating systems. This protocol is supported by all major operating systems including Android, Windows Phone, Windows Desktop, Linux and now iOS and Mac. In this post I’m going to talk about IPSec and in my next posts I’ll talk about IKEv2 as well. In addition to these protocols, Apple gives you the ability to create your own protocol if needed! This feature is a very important features for those who have implemented their own protocol; because now it’s possible to implement that protocol on iOS and Mac as well. OK, lets set up our IPSec protocol:
NEVPNProtocolIPSec *p = [[NEVPNProtocolIPSec alloc] init];
p.username = @"[Your username]";
p.passwordReference = [VPN user password from keychain];
p.serverAddress = @"[Your server address]";
p.authenticationMethod = NEVPNIKEAuthenticationMethodSharedSecret;
p.sharedSecretReference = [VPN server shared secret from keychain];
p.localIdentifier = @"[VPN local identifier]";
p.remoteIdentifier = @"[VPN remote identifier]";
p.useExtendedAuthentication = YES;
p.disconnectOnSleep = NO;
In the first line, I’ve created a new instance of NEVPNProtocolIPSec. This class is inherited from NEVPNProtocol class. NEVPNProtocol class is an abstract class you can use to create your own protocols.
Then, we specified our username and password in the second and third line. Notice that the password is a reference from Keychain; so, you need to store your password in Keychain first and then retrieve it.
The fourth line is our server address. Server address can be an IP, a host name or a URL.
Next is authentication method. iOS 8 supports three authentication methods
NEVPNIKEAuthenticationMethodNone:Do not authenticate with IPSec server.NEVPNIKEAuthenticationMethodCertificate:Use a certificate and private key as the authentication credential.NEVPNIKEAuthenticationMethodSharedSecret:Use a shared secret as the authentication credential.
As you can see, I’ve used Shared Secret method; but, you can use whatever method you want.
The next line is Shared Secret reference. Again it’s reference from Keychain; so, you need to get Shared secret from there. If you’re going to use certificate rather than shared secret. There’s no need to fill sharedSecretReference property; instead, you have to fill identityData property. Identity data is the PKCS12 data for the VPN authentication identity. The value for this property must be a NSData in PKCS12 format:
p.identityData = [NSData dataWithContentsOfFile:[[NSBundle mainBundle] pathForResource:@"clientCert" ofType:@"p12"]];
The next two lines are local and remote identifiers. These two are strings identifying the local and remote IPSec endpoints for authentication purposes.
The next property we need to set is useExtendedAuthetication. This is a flag indicating if extended authentication will be negotiated. This authentication is in addition to the IKE authentication used to authenticate the endpoints of the IKE session. For IKE version 1, when this flag is set X-Auth authentication will be negotiated as part of the IKE session, using the username and password properties as the credential. For IKE version 2, when this flag is set EAP authentication will be negotiated as part of the IKE session, using the username, password, and/or identity properties as the credential depending on which EAP method the server requires.
The last property to set is disconnectOnSleep. This boolean indicates whether the VPN connection must be disconnected when the device goes to sleep or not.
OK that’s enough for protocol. The next thing we have to do is to assign the protocol we’ve just created to the VPN manager. To do so, the setProtocol: method can be used.
[manager setProtocol:p];
IPSec and IKEv2 protocols have a very cool feature called On-demand. This feature enable connect to connect automatically whenever user attempted to connect to the internet. In iOS 8, it’s possible to enable on-demand on the connection. But, I’m going to cover this feature in another post; therefore, lets leave it for now and set the onDemandEnabled property to NO for now.
[manager setOnDemandEnabled:p];
The last thing we must set is the description of VPN preference we’re going to create. To do so, just set its localized description property by using setLocalizedDescription: method
[manager setLocalizedDescription:@"[You VPN configuration name]"];
We’re almost done. We’ve set up the configuration but haven’t saved it yet. To save the configuration simply call the saveToPreferencesWithCompletionHandler: method:
[manager saveToPreferencesWithCompletionHandler:^(NSError *error) {
    if(error) {
        NSLog(@"Save error: %@", error);
    }
    else {
        NSLog(@"Saved!");
    }
}];
This method simply saves your specified configuration to the system settings.
Connect to the VPN connection we’ve just created
Now that you’ve saved your settings to system’s preferences, it’s time to connect to it. NEVPNManager has a property called connection. This property is an object of NEVPNConnection class. It holds information which is responsible for VPN connection. To connect to VPN server you’ve just created, simply call startVPNTunnelAndReturnError: method of NEVPNConnection class just like below:
- (IBAction)buttonPressed:(id)sender {
    NSError *startError;
    [[NEVPNManager sharedManager].connection startVPNTunnelAndReturnError:&startError];

    if(startError) {
        NSLog(@"Start error: %@", startError.localizedDescription);
    } else {
        NSLog(@"Connection established!");
    }

}
Run the application on your device and you’ll see and new connection will be create and you can connect to it by tapping the button. Also, you can disconnect from VPN server programmatically as well by calling stopVPNTunnel method of NEVPNConnection:
If you have any idea, suggestion or anything else regarding this post, please leave your comments down below. I’ll blog about IKEv2 and On-demand features in the near future. Stay tuned.


