My first experience with Zoho Mail

If you have your own domain and website, you probably want to have some @yourdomain emails as well. Although some hosting providers offer free email hosting, some simply don’t. You also have to configure your own mail server if you’re owning a VPN or dedicated server.

If you’re setting up a mail server for your company, there are some premium mail providers available such as Microsoft Office 365 and GSuite that offer huge amount of features such as online storage, document editing features and so on. On the other hand, people like me may just need to have an email address on their own domain. They need a good email server but don’t want the extra featured which I have mentioned a couple of them few lines above. At this point you want to give Zoho Mail a try.

Zoho Mail is an email hosting service is offers just I wanted. All you need to do is to sign up. They guide you through the process of setting things up and then you will have the access to your new inbox. The free plan offers up to 5 users for free. This free plan gives you full access to their web panel and well as Zoho Mail app so you can check your email either on you phone or your computer. However, if you need IMAP or POP access, you need to upgrade to a premium plan as low as $1 per month.

Zoho Mail subscription plans

You can find more information other their website at: https://www.zoho.com/mail/

Moving to Jekyll

When I started this blog at 2008, I used BlogEngine blogging platform to publish my posts. I chose BlogEngine because it was (Or maybe is) written in .NET and I was a .NET enthusiast at that time. After a few years of blogging with The BlogEngine platform, I decided to move to WordPress. WordPress the the most popular blogging platform and I was very satisfied with it. It has a very powerful text editor and a feature-rich administrator panel.

The problem starts when I lost all of my posts! I was a GoDaddy user for a couple of years and due to International sanctions against Iran, I couldn’t pay for my subscription and didn’t have backup of my posts.

WordPress is actually an awesome platform; however, to to able to deploy it to your website, You should install a few prerequisites. The first requirement is the PHP programming languages because it is written in PHP. The second is the MySQL database!

This could cause some minor issues when wanting to backup your website data. To create a backup in WordPress, you will need to backup your not only your files but your database as well.

Jekyll

Jekyll is a very simple programmer-friendly blogging platform. I works by compiling markdown files into pure HTML files. All you need to do is to create a markdown file, write your post and then compile it to HTML files. You can then upload those files to your hosting storage or using simply use GitHub Pages and forget about paying for hosting storage since Github gives you unlimited bandwidth and storage.

When using Jekyll with GitHub Pages, you have to git push your files into a Github repository to post them to be able to see them on your website. By doing so, you have also backed up your code as well.

If you’re interested as I do, you can give Jekyll a try . In addition, you can access the source code of this blog by clicking here

Configure and manage VPN connections programmatically in iOS 8

Connecting to VPN servers programmatically had been always an impossible task to do for developers because of Apple’s limitations.

In my previous post I’ve described that Apple introduced a brand-new Network Extension framework which gives developers the opportunity to configure VPN preferences programmatically but I didn’t describe how!

This post is a guide to manage VPN configurations in iOS 8 and OS X (10.10) Yosemite while there’s no official documentation published yet. I Also have to thank quellish who helped me a lot in this.

Requirements

  1. The very first and the most critical things you need is an actual device with iOS 8 beta 1 or above to test the app on! This tutorial cannot be tested on iPhone simulator. If you’re going to write a Mac application, OS X Yosemite Preview 3 or above has to be installed.
  2. Since this test doesn’t work on simulator, you have to be a member of iOS/Mac developer program. Also, you need to make some changes to your provisioning profile. You cannot use your iOS 7 provisioning profiles to develop iOS 8 VPN applications.
  3. Xcode 6 beta. By the time of this post (August 2nd, 2014), Xcode 6 is in beta 4 and just like I’ve mentioned in my previous post, you need to to a member of iOS/Mac program to have access to beta tools.
  4. Last but absolutely not least, you need a Mac since Xcode cannot be run on Windows or Linux machines.

Getting Started

The first thing you need to do before actually start writing any codes is to update your provisioning profiles. If you haven’t created any profiles yet, you need to create one now! To do this, login to your developer account, then click on “Certificate, Identifiers & Profiles”:
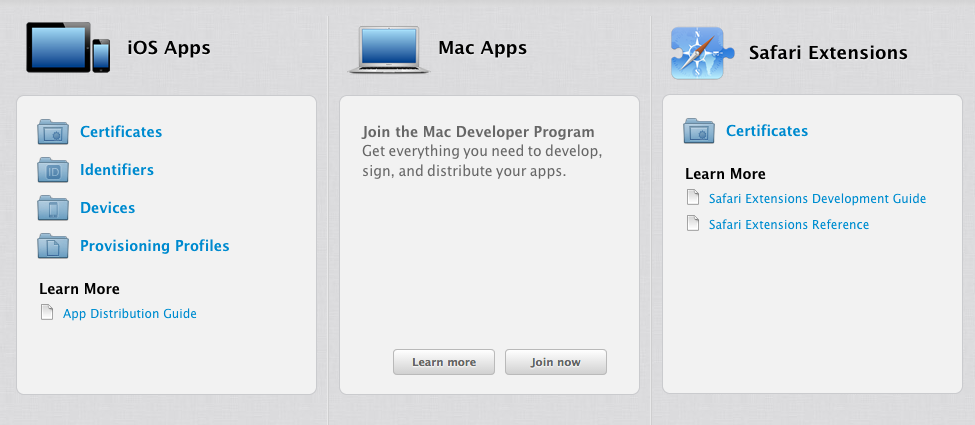
Update provision profile

Select Identifiers, then select the application you want to update its provisioning profile. If you don’t have any, you can create one using the plus sign. By selecting an app, a list will be appeared. This is a list of features the app is going to use, for example if you want to have iCloud functionality in your application, you have to turn iCloud feature on; otherwise, you won’t be able to test and deploy your iCloud based apps. The following is showing that list:
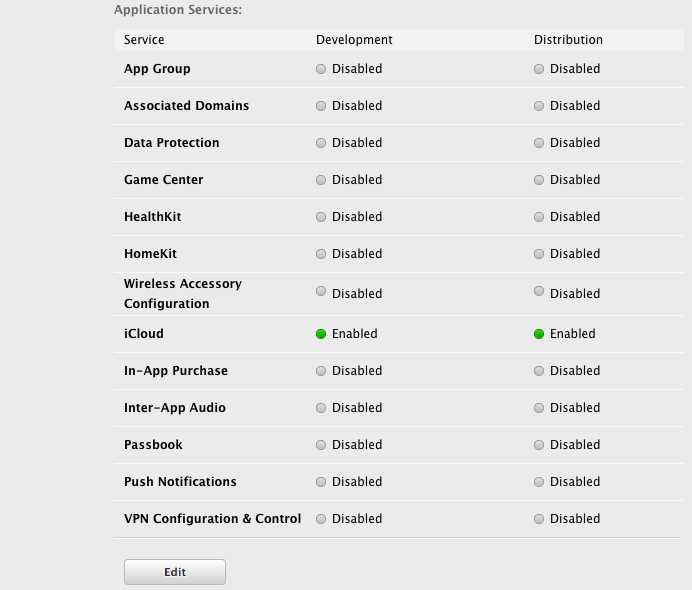
Update identifiers

By the introduction of iOS 8, a new item has been added to this list which is “VPN Configuration & Control”. This is exactly what we’re looking for! So enable this feature by clicking on it and then ticking its checkbox. When you turn this feature on a modal window will be displayed which describes its functionality:
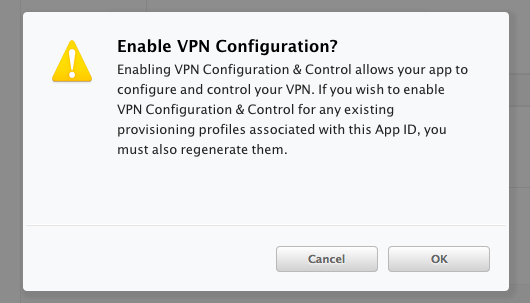
Enable VPN functionality

Enable VPN Configuration & Control feature and click “Done”. Then, download the provisioning profile again and replace it with the old one. We’re done here, now lets get back to Xcode.

Note: In this post I assume that you’re familiar with iOS development and Objective-C. If you’ve never developed any app in for iOS or Mac, you may need to learn some basic concepts and then return to this post.

Open Xcode and create a new iOS 8 single view application project. Then, place a button in the middle of screen and then connect it to your ViewController.

What we’re going to do is to setup VPN preferences on viewDidLoad: method and then connect to our specified VPN server when the button is tapped.

Before getting started, you have to know how all this work! If you understand the structure of Network Extension framework, then it will be much easier to develop apps based on it.

NetworkExtension.framework

Apple has done a brilliant job developing this framework. Every app can access system preferences but in its own sandbox; which means you cannot access other apps’ sandboxes.

First of all, saved preferences have to be loaded from OS to be able to be accessed. Once they’re loaded, it’s possible to make your changes. After changes have been made, they need to be saved. Unsaved preferences won’t be applied. Your app’s preferences can also be removed if you no longer need them. As a result, to create a VPN configuration we need to do the following:

  • Load our app’s preferences
  • Make our changes
  • Save preferences

Note that you need to load your app’s preferences even if you haven’t set any configuration yet.

After VPN connection is created we can connect to or disconnect from it.

Network extension contains three major classes:

  • NEVPNManager
  • NEVPNProtocol
  • NEVPNConnection

NEVPNManager is the most important class in this framework. It’s responsible for load, save and remove preferences. In fact, all VPN tasks have to be done through this class.

Create a new VPN connection

To get started a new instance of this class has to be created:

NEVPNManager *manager = [NEVPNManager sharedManager];

After NEVPNManager is initialized, system preferences can be loaded using loadFromPreferencesWithCompletionHandler: method:

[manager loadFromPreferencesWithCompletionHandler:^(NSError *error) {
    // Put your codes here...
}];

As I’ve mentioned in above code, the load method accepts a compilation handler block. This block is fired whenever the load process is completed. This block also has a parameter which is an NSError. the NSError parameter will be nil if the loading operation completed; otherwise, it will be non-nil. Accordingly:

[manager loadFromPreferencesWithCompletionHandler:^(NSError *error) {
    if(error) {
        NSLog(@"Load error: %@", error);
    } else {
        // No errors! The rest of your codes goes here...
    }
}];

After loading process is completed, It’s time to set up our VPN connection.

iOS 8 supports two major protocols. IPSec and IKEv2. It’s the first time that Apple offers IKEv2 protocol in its operating systems. This protocol is supported by all major operating systems including Android, Windows Phone, Windows Desktop, Linux and now iOS and Mac. In this post I’m going to talk about IPSec and in my next posts I’ll talk about IKEv2 as well. In addition to these protocols, Apple gives you the ability to create your own protocol if needed! This feature is a very important features for those who have implemented their own protocol; because now it’s possible to implement that protocol on iOS and Mac as well. OK, lets set up our IPSec protocol:

NEVPNProtocolIPSec *p = [[NEVPNProtocolIPSec alloc] init];
p.username = @"[Your username]";
p.passwordReference = [VPN user password from keychain];
p.serverAddress = @"[Your server address]";
p.authenticationMethod = NEVPNIKEAuthenticationMethodSharedSecret;
p.sharedSecretReference = [VPN server shared secret from keychain];
p.localIdentifier = @"[VPN local identifier]";
p.remoteIdentifier = @"[VPN remote identifier]";
p.useExtendedAuthentication = YES;
p.disconnectOnSleep = NO;

In the first line, I’ve created a new instance of NEVPNProtocolIPSec. This class is inherited from NEVPNProtocol class. NEVPNProtocol class is an abstract class you can use to create your own protocols.

Then, we specified our username and password in the second and third line. Notice that the password is a reference from Keychain; so, you need to store your password in Keychain first and then retrieve it.

The fourth line is our server address. Server address can be an IP, a host name or a URL.

Next is authentication method. iOS 8 supports three authentication methods

  • NEVPNIKEAuthenticationMethodNone: Do not authenticate with IPSec server.
  • NEVPNIKEAuthenticationMethodCertificate: Use a certificate and private key as the authentication credential.
  • NEVPNIKEAuthenticationMethodSharedSecret: Use a shared secret as the authentication credential.

As you can see, I’ve used Shared Secret method; but, you can use whatever method you want.

The next line is Shared Secret reference. Again it’s reference from Keychain; so, you need to get Shared secret from there. If you’re going to use certificate rather than shared secret. There’s no need to fill sharedSecretReference property; instead, you have to fill identityData property. Identity data is the PKCS12 data for the VPN authentication identity. The value for this property must be a NSData in PKCS12 format:

p.identityData = [NSData dataWithContentsOfFile:[[NSBundle mainBundle] pathForResource:@"clientCert" ofType:@"p12"]];

The next two lines are local and remote identifiers. These two are strings identifying the local and remote IPSec endpoints for authentication purposes.

The next property we need to set is useExtendedAuthetication. This is a flag indicating if extended authentication will be negotiated. This authentication is in addition to the IKE authentication used to authenticate the endpoints of the IKE session. For IKE version 1, when this flag is set X-Auth authentication will be negotiated as part of the IKE session, using the username and password properties as the credential. For IKE version 2, when this flag is set EAP authentication will be negotiated as part of the IKE session, using the username, password, and/or identity properties as the credential depending on which EAP method the server requires.

The last property to set is disconnectOnSleep. This boolean indicates whether the VPN connection must be disconnected when the device goes to sleep or not.

OK that’s enough for protocol. The next thing we have to do is to assign the protocol we’ve just created to the VPN manager. To do so, the setProtocol: method can be used.

[manager setProtocol:p];

IPSec and IKEv2 protocols have a very cool feature called On-demand. This feature enable connect to connect automatically whenever user attempted to connect to the internet. In iOS 8, it’s possible to enable on-demand on the connection. But, I’m going to cover this feature in another post; therefore, lets leave it for now and set the onDemandEnabled property to NO for now.

[manager setOnDemandEnabled:p];

The last thing we must set is the description of VPN preference we’re going to create. To do so, just set its localized description property by using setLocalizedDescription: method

[manager setLocalizedDescription:@"[You VPN configuration name]"];

We’re almost done. We’ve set up the configuration but haven’t saved it yet. To save the configuration simply call the saveToPreferencesWithCompletionHandler: method:

[manager saveToPreferencesWithCompletionHandler:^(NSError *error) {
    if(error) {
        NSLog(@"Save error: %@", error);
    }
    else {
        NSLog(@"Saved!");
    }
}];

This method simply saves your specified configuration to the system settings.

Connect to the VPN connection we’ve just created

Now that you’ve saved your settings to system’s preferences, it’s time to connect to it. NEVPNManager has a property called connection. This property is an object of NEVPNConnection class. It holds information which is responsible for VPN connection. To connect to VPN server you’ve just created, simply call startVPNTunnelAndReturnError: method of NEVPNConnection class just like below:

- (IBAction)buttonPressed:(id)sender {
    NSError *startError;
    [[NEVPNManager sharedManager].connection startVPNTunnelAndReturnError:&startError];

    if(startError) {
        NSLog(@"Start error: %@", startError.localizedDescription);
    } else {
        NSLog(@"Connection established!");
    }

}

Run the application on your device and you’ll see and new connection will be create and you can connect to it by tapping the button. Also, you can disconnect from VPN server programmatically as well by calling stopVPNTunnel method of NEVPNConnection:

If you have any idea, suggestion or anything else regarding this post, please leave your comments down below. I’ll blog about IKEv2 and On-demand features in the near future. Stay tuned.
How to create installation DMG files in OS X

One of the coolest features of Mac OS in comparison with Windows is the simplicity of apps’ installation. In Windows, in most cases, there should be an installation package; otherwise, the app won’t run correctly. On the contrary, Mac apps installations are much simpler. All you need to do is to copy the app bundle to the Applications folder; so, no installation is needed. The installation process of Skype for Mac is a very good example. To install Skype you just need to drag the app icon into the Applications folder. by doing this, you’re copying the Skype app bundle to your Applications folder. The following is the Skype installation page for OS X:

Skype installation DMG

Now how can you create such installation page for your own app?

First of all, look at the picture above. The installation page contains three major sections:

  • The First is the application bundle (in this case, Skype.app).
  • The second is the OS X Applications folder.
  • The third one is the background image of the installation page.

These three things are the requirements to create a DMG installation file. However, you can ignore the background image and let it be just a solid white color background, it’s much better to have a custom background color or image for your installation page. It make your installer more friendly and of course more beautiful. In addition, there is one more requirement (which is obvious of course): You will need a Mac machine to build DMG installation files. As far as I know, you cannot create DMG installation files in Windows.

Getting Started

After all of three requirements I’ve mentioned above were present, you can get started. I decide to break this tutorial into steps so it’s much easier to understand:

The very first thing to do is to create an empty DMG file so we can put our custom files in it. To do so, OS X has a built-in tool named Disk Utility. You can simply search for it in spotlight search box (On the top right of your screen).

Disk Utility Home

In the Disk Utility home page click New Image button on the top of screen. When New Image button is clicked, a window will be appeared like the following:

Disk Utility New Image

There are some settings in the New Image window which need your consideration. The first field is the path of your DMG file that is going to be created. The second field is name. It is recommended to set this field as the name of your application because users will see this name when they mount your DMG file on their machine. The third field is size of disk image. Unfortunately, disk images’ file sizes could not be dynamically allocated so you need to pick a size which is right for your application’s size. It’s recommended to choose a size which is a little larger than your application bundle (The minimum size of disk image is 21MB in OS X). The forth field is image format. This field’s value is set to Mac OS extended by default and there’s no need to change it; so, leave it as it is. Encryption and Partitions fields are fifth and sixth fields in the New Image window which should be left as the default value. We don’t need any encryption or partitioning for now. The last field, Image Format, is sightly important here. You have to set this field’s value to read/write disk image. You won’t be able to create the installation DMG if you select anything else! After setting all fields, click Create to create the disk image.

By clicking Create your disk image will be created and will be automatically mounted. Close Disk Utility, go to Desktop and double-click on the mounted image to see its content. You can see the disk image is empty as you expected. In the next section we need to fill it by adding our custom files. The reason we’re able to add files to our disk image is because we set the image format field to “read/write disk image”.

It’s time to add our custom-designed background image to our installation (If you don’t want to add an image to your installation page, you can skip this section).

You can simply drag your custom background image to the mounted disk. As you can see the file has been copied to the disk image but has not set as disk image background. To do so, right click on the mounted image on your mac desktop and select Show View Options. Show View Options

There are two things that need to be taken care of in the Show View Options page. The first one is Icon Size and the second is Background.

Icon Size indicates the size of our two main icons in the installer page (Our two icons are your app bundle icon and the Applications icon). Icon size is completely up to you. In the Skype example I’ve mentioned earlier, the icon size is set to the maximum which is 128*128 pixels. I myself prefer to use the maximum as well; because, it makes it easier for users to do the drag-drop action.

After setting the icon size, it’s now time to set the background image. Just select picture item from background radio button group and then DRAG the image you’ve just copied into the disk image (not from other paths of your hard drive) to the “Drag image here” section. As soon as you drop the image, the background will be set. There’s no Save button. All changes will be saved automatically; so, you can close Show View Options window. You can also resize the disk image window by its corners (as same as what you do when want to resize other windows in OS X) to fit your window size with the background image.

The interesting part is that all of your actions will be kept and the next time you open your disk image, background image, icon size and window size is saved.

Note: DO NOT CLICK ON “USE AS DEFAULT” BUTTON. IT WILL SET YOUR SPECIFIED CONFIGURATION INCLUDING BACKGROUND IMAGE TO ALL FOLDERS ON YOUR MAC.

As you may have noticed, The image file is in the middle of disk image window. We need to make it hidden so users can’t see it. There are plenty of ways to make a file hidden but one of the coolest ways is to add a “.” to the first of file name. In Unix systems like Mac, files which are started by a “.” are hidden by default. You can’t change the file name in the finder. You need to rename the file in terminal. So open a terminal window and do the following:

cd /Volumes/[YOUR DISK IMAGE NAME]
mv [YOUR BACKGROUND FILE NAME] .[YOUR BACKGROUND FILE NAME]

As you can see the file is now hidden!

The next step is to copy our app bundle. To do it just copy the app bundle to your disk image. You can also change the location of app bundle to any place of disk image we want. After the bundle has been copied, We need to make an Application icon so use can drag the app to it. To do so, go to you Macintosh HD, click on Applications, hold Command and Option key, and dray it to the disk image window. By holding Command+Option it will make an alias of that folder. Note that we’re not copying the Applications folder, we’re just making an alias from it. Place the two icons near each other so it’s easier for users to install the app.

We’re almost done. Your installation DMG file is ready; but, there is something. By publishing this DMG file, all users can change its background image, icon size, window size, and etc. In fact, they can do whatever you can! To prevent this, we need to make this disk image read-only.

Eject the disk image by right-clicking on disk image icon and selecting “Eject”. Re-open the Disk Utility tool again. On the left side of Disk Utility home pas select the DMG file we’ve created, then, select Convert. The convert window will show up. select a unique name for it and from Image Format select read-only. Click save to create a new disk image from your selected one. The new DMG file we’ve just created is read-only can be safely published and others cannot make changes to it.

If you have any question, don’t hesitate a moment; just ask it on the comments down below.